If a couple of parrots of different sexes live in a cage, then the owner may think about the advisability of breeding them. To do this, a special nest for budgerigars is installed inside the cage, in which the female lays and incubates eggs.
It can be represented by a house, and it can be made with your own hands or purchased ready-made. It is recommended that you first study the basic requirements for this subject.
What is a nesting house for?
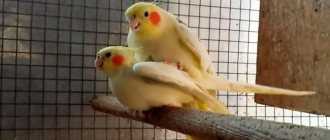
Many people get a second budgie so that their first pet doesn't get too bored. But if the birds are of different sexes, then they can begin mating games.
If they do not have a house or nest, the bird will not be able to begin the nesting process. Therefore, a nest is installed only if a person wants to independently breed birds.
It is quite simple to understand that birds have begun mating games, as this is accompanied by the following actions:
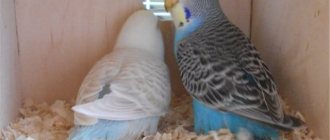
the male sings songs and dances around the female;- the birds show mutual signs of attention;
- they clean each other's feathers and feed from their beaks;
- Birds chirp and chirp constantly throughout the day;
- parrots regularly touch their beaks, which imitates a kiss.
If a person notices the beginning of such mating games, then he can install a nesting house inside the cage, designed for incubating chicks. The process must be completed in advance so that the female has time to organize the internal space to care for the small chicks.
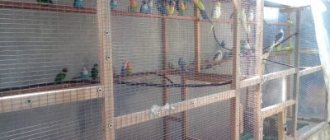
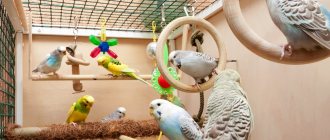
The nest is installed on the bottom of the cage or suspended from the wall outside or inside.
It is best for the nest to be located inside the enclosure , as the bird will feel safe and calm. But this option is not suitable if the cell is small. Regardless of the method chosen, it is necessary to securely attach the product to the cage so that it does not fall or move.
Did your parrots have chicks?
Not really
Preparing for nesting
A nest is necessary for budgerigars only in one case, when they begin nesting, that is, preparing for reproduction. Usually, a person buys a pair for his feathered friend and begins to look forward to the appearance of little chicks. But sometimes this process can be delayed or complicated. Let's look at some of the nuances that need to be taken into account when nesting budgies at home:
- Have patience and watch the birds first. If you notice that the wavy birds are constantly next to each other, cooing and plucking feathers, then soon they will need a nesting house. But it happens that a couple sits quietly and the birds are not at all interested in each other. It's best to look for another partner. To avoid making a mistake again, pay attention to the colors of the parrots. It is generally accepted that birds with the same shade of color form a pair well and quickly.
- Also consider the age of the birds. They are not ready to breed if they are less than a year old. The female may simply die while laying eggs. With good care and proper nutrition, parrots can produce offspring for up to about 9 years.
- Do not prepare a related couple for breeding. At the same time, the risk of chicks being born with serious defects, delays in growth and development increases, and the death of the offspring is also possible at the embryonic stage.
- In the wild, parrots are ready to breed almost all year round. At home, you need to take into account the short daylight hours during the cold period, so it is best to prepare birds for nesting in warm times - in summer and autumn, at this time the daylight hours are long and there is an abundance of fresh vegetables and fruits, which are so necessary for the full development of the birds themselves and their cubs.
And, of course, the main condition for breeding budgies is the presence in the cage or near it of a comfortable nesting house. How can you tell if the female liked the nest? She will look into it curiously and nibble on the entrance.
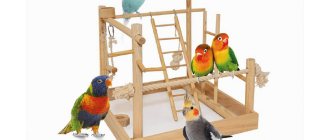
What shape and size do you need a house?
The exact dimensions depend on where exactly the nest will be installed. To do this, the dimensions, shape and location of the cell are taken into account. There are several types of nesting houses, which include:
- Horizontal. It is convenient because the bird can enter and exit without damaging the masonry. The disadvantages include the device of the taphole, represented by an entrance hole. It is too low, so the chicks often leave the nest too early.
- Vertical. It is considered not a very suitable option, since the entrance is located high, so the chicks have difficulty leaving the nest. The female herself can harm the eggs.
- Compromise. It is chosen most often, and you can do it yourself. It combines the advantages of the two above options. It has a suitable width, so it can easily accommodate the clutch and the female. The height of the entrance allows the chicks to leave the house in a timely manner. They will never be cramped inside the nest, so the likelihood of injury is minimized.
If a large nest is selected, then it is placed only on the bottom of the cage. Small houses can be attached to the walls. Combined nests have dimensions of 22x20 cm and a height of 20 cm.
Materials for work
The main requirement for materials for the construction of a shelter is their naturalness.
Common options are:
- Thin boards of deciduous trees (not treated with impregnations or other compounds).
- Plywood.
- Chipboard.
- Plastic.
The first option is the most acceptable, since the boards do not contain harmful chemical compounds. Softwood lumber is not suitable because it may contain resin pockets. Sulfur will subsequently be released from them, which will harm the chicks and the female.
Plywood is also suitable for construction, but birds may not like chipboard - it contains a high content of harmful substances.
Plastic houses sold in stores are not always liked by pets. They may have a strong odor or be awkward in size.
Tools you will need:
- jigsaw - for cutting material;
- screwdriver and self-tapping screws - for connecting parts;
- tape measure and pencil - for marking.
To determine the inlet hole (tap hole), a compass or container of the required diameter is suitable.
How to make it yourself
Even people who do not have unique skills or experience can make a nesting house with their own hands.
To avoid mistakes, it is important to understand the design, which consists of the following parts:
- Letok. It is represented by the entrance to the nest and also has a round shape. Its diameter should exceed 4 cm. The tap hole is located on top of the front part of the nest. A perch can be installed below, making it easier for the female to enter the nest. A perch is not needed if the entrance is low.
- Litter. You can do it yourself or entrust this process to a female. Sawdust is considered an ideal basis for bedding. They perfectly absorb unpleasant odors and moisture. A layer about 3 cm thick is made. It is first recommended to mix sawdust with chamomile flowers, which have excellent antiseptic properties.
- Lid. It is advisable to make it folding or removable, which simplifies the process of cleaning the structure. Additionally, it becomes possible to periodically look inside to check the chicks.
- Ventilation. Chicks require fresh air, so special openings must be provided.
Before installing the nest inside the cage, disinfection is carried out. To do this, the structure is doused with boiling water or treated with special antiseptics. Afterwards, it is thoroughly washed to remove any remaining product.
Ready-made models
You can purchase or order a special nesting house in the store. Such models are already equipped with metal hooks, most of them have all the necessary parameters, are safe, equipped with hinged lids, perches, and convenient entry. There are models made from natural coconuts, wood, dried meadow grass stalks, plastic, metal rods, and fabric. The assortment is very large and varied, sometimes it is easier to buy a ready-made option than to make a nest with your own hands.
What you need to prepare for the design
If you plan to create a nest yourself, then you need to prepare the following elements:
- drawing of the future nest;
- wooden boards, and they can be obtained by destroying an ordinary wooden box;
- boards can be replaced with plywood, but it is not recommended to use chipboard, as this material is of low quality;
- screws and hammer;
- wooden perch;
- special fastenings with which the nest is fixed to the walls of the cage.
It is advisable to treat with antiseptics before connecting all the parts, which will greatly simplify the work.
The photo shows one of the drawing options for making a nest:
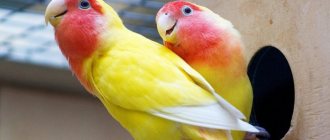
Nest for lovebirds
Already from the first days of March, when daylight hours become longer, lovebirds begin to prepare for mating. Birds should be provided with the opportunity to leave their cage for at least an hour or two a day. This will improve their appetite, metabolism, and strengthen their muscles, which will have the best effect on their ability to reproduce. When the days are warm, the cells can be moved into the sun for 20-30 minutes. It is important to monitor a balanced diet for birds, consisting of grains, fresh fruits, herbs, and minerals. Individuals reach sexual maturity by the end of the first year of life, but more successful incubation and feeding is observed in two-year-old pairs.
Creating a house in stages
The manufacturing process of the structure is divided into stages:
- a diagram is formed on which the dimensions and parameters of the future nesting house are noted;
- drawings are made according to which wooden elements are cut;
- a floor, four walls and a roof are formed;
- the parts are connected using ordinary self-tapping screws or nails;
- the lid is fixed only on one side, so it turns out to be hinged;
- a taphole is cut out on the front wall, for which you need to step back about 5 cm from the edge, and a round hole is made, the diameter of which is from 4 to 6 cm;
- A wooden perch is inserted into the nest under the entrance.
At the end of the process, small holes are formed on the sides, which are intended for ventilation, and their diameter is approximately 0.8 cm.
Building a nest for lovebirds
The cage must be equipped with it. Under natural conditions, an ordinary hollow is suitable for this purpose. In captivity, it is replaced by a nesting house (box). If this condition is not met, reproduction will not take place - this is how nature intended. To make a nest box, you will need well-dried boards 2 cm thick. The parameters of the nesting house are as follows: bottom 17 x 17 cm, height 25 cm, entrance 5 cm. It is important to remember to drill holes in the bottom for ventilation. They should be 8mm in diameter. The parts of the nest box are fastened with nails and screws. The inner surface of the nesting box is not treated, leaving it rough - this is more convenient for the parrots. You can walk outside with a planer. The cover is secured with screws to the hinges. The bottom is also attached with screws.
How to hang a nest box
It can be fixed outside or installed inside the cage. The first method is suitable if the cell is too small. But the female is more comfortable if the nesting area is located directly at the bottom of the cage. In this case, the male usually spends a lot of time on the roof of the house, which serves as a kind of support for the second parrot.
The cage must be spacious so that a person can lift the nest lid to carry out hygiene procedures or monitor the condition of the chicks. Fixation is done with wire or strands. It is important to ensure that the cage bars are highly durable and reliable. If the nest is suspended, you need to make sure that it cannot fall when there is masonry in it.
Breeding parrots should only be done in a quiet, warm and bright room, since if it is too noisy, the chicks will be afraid and therefore will not leave the nest on time.
But now you have your first long-awaited egg!
From this moment on, we stop feeding the female protein food and switch only to grain mixture. We return all supplements to the diet with the appearance of the first chick. The female will now lay eggs every other day until the clutch averages 5-8 eggs. Young females lay less, while older females lay more. After the first egg appears, the female begins to incubate it. Only the female incubates, because During the courtship period, a so-called “brooding spot” appears on her stomach. The skin on the abdomen swells and heats up, because it is penetrated by a network of tiny blood vessels. The feathers in this place partially fall out, most of the feathers spread to the sides, and the female lays on her eggs with this hot spot. From this moment on, embryos begin to develop in the eggs. Throughout this period, the male is in charge of feeding the female. He brings her food, sometimes stays in the house, but only the female incubates the eggs.
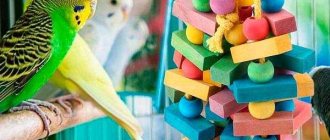
Nesting equipment
It is forbidden to place toys or a mirror in it, so only soft and warm bedding is created. The nest is intended for raising chicks, and not for active play. Therefore, all foreign objects must be kept outside of it. The house does not need special lighting, so it is enough to keep the room light.
The house is equipped with the following elements:
- a special perch that is fixed under the entrance and makes it easier for the female to form a clutch;
- bedding placed on the bottom of the house, and it is made from sawdust mixed with chamomile flowers, and all debris must first be removed.
The presence of a nest in a cage does not guarantee the breeding of parrots, since a trusting relationship must be established between the birds, and they must also be provided with optimal living conditions.
How many steps does it take to hatch a Larvesta egg?
- Data Pokemon Data Pokédex
- moves
- Type table
- Capabilities
- PC.
- Evolution chains
- Pokemon locations
- Sprite gallery
- Links
- National Pokédex
- List of Pokemon with statistics
- Pokédex of Ultra Sun and Ultra Moon
- Let's go, Pikachu / Eevee Pokédex
- Pokédex Sword & Shield
- Breeding and egg groups
- Sword and shield
Five days of incubation have passed
Blood vessels and a very tiny embryo are visible in the egg. It is convenient to candling eggs using a special candling lamp. It is shaped like a ballpoint pen with a light bulb at the end. If you bring a light bulb close to the egg and shine it through, you can see the nascent life inside the egg. It is not recommended to remove eggs from the nest, because... You can simply drop the egg and it will break, or if handled improperly, it may crack. And yet, the egg is covered on top with a protective layer that protects it from infection.
Therefore, it is absolutely not advisable to pick up eggs.
An experienced owner needs only one look at the egg to understand whether it is fertilized or not.
Fertilized eggs are matte gray-white.
Unfertilized - shiny, yellow-white or spotted.
In ten days, even an amateur who is not entirely experienced in breeding will be able to determine “live” eggs from “non-living” ones. A live egg will be identifiable by its grey-white, porcelain-like shell, while a dead egg will appear grey-brown, spotted and yellowed.
If you have no experience in determining the fertilization of eggs by external signs, it is better not to take any action and still wait until the deadline for the last egg to hatch before removing the obviously “dead” eggs.
Incubation of clutch
The incubation period for budgerigars lasts 18 days.
This is quite a long period for birds of this size, and since the female lays eggs every other day, in a clutch consisting of 6 eggs, the age difference between the chicks will be 12 days, and in a clutch consisting of 9 eggs - even 18 days . The female turns the eggs several times a day so that the outer ones, which have cooled down, roll closer to her, under her “brooding spot” on the stomach. Thus, the embryo develops and is heated evenly. If it suddenly happens that an egg has rolled too far and is not heated, then the film under the shell sticks to it, and the embryo may die from lack of heat.